- Published on
Using AWTRIX Light with HomeAssistant
- Authors

- Name
- Carsten Noetzel
Preface
In a previous blog post the Ulanzi smart pixel clock has been flashed with AWTRIX Light and connected to HomeAssistant. The following article describes how to send HomeAssistant sensor data to the clock and control it via HA-Dashboard.
Preparation
After installing AWTRIX Light there are several built-in applications like Time, Date, Temperature, Humidity and Battery status which are displayed alternately per default. As the internal sensors for temperature and humidity aren't that accurate and the clock is operated entirely with a power supply I deactivated all built-in apps except Time and disabled autmatic page switch via onscreen menu.
In my case the clock should primarily show the time and notify about events. A page switch should only occur when triggered via button press or HomeAssistant.
Icons
To give sensor data a context instead of showing plain values AWTRIX allows you to display icons with you apps and notifications. Icons have to be downloaded first via webinterface in order to use them.
LaMetric-Icons are compatible with AWTRIX so the LaMetric-Icon database is the first source to search for suitable icons.
Apps and Notifications
AWTRIX Light allows you to design custom apps or notifications to display on the clock. While apps allow you to store and update custom data on the clock notifications are used to display one-time messages. Both are sent via MQTT to the clock. Documentaion can be found under MQTT / HTTP API.
Custom PiHole-App
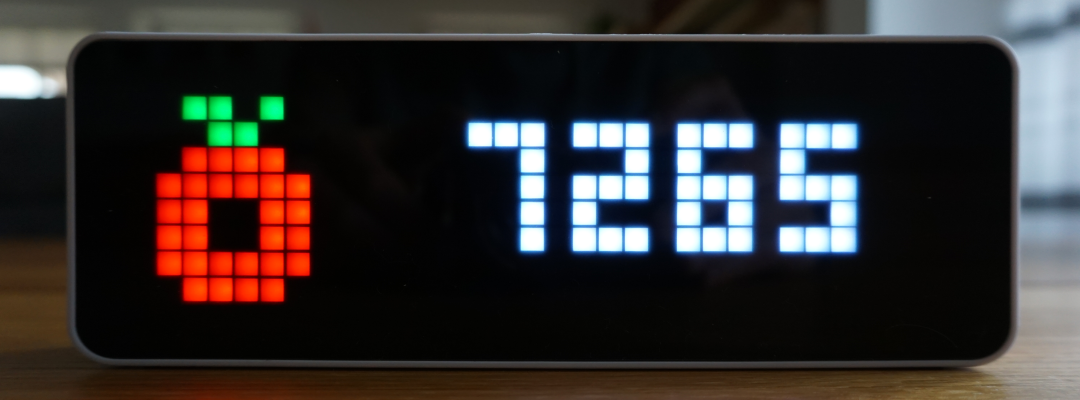
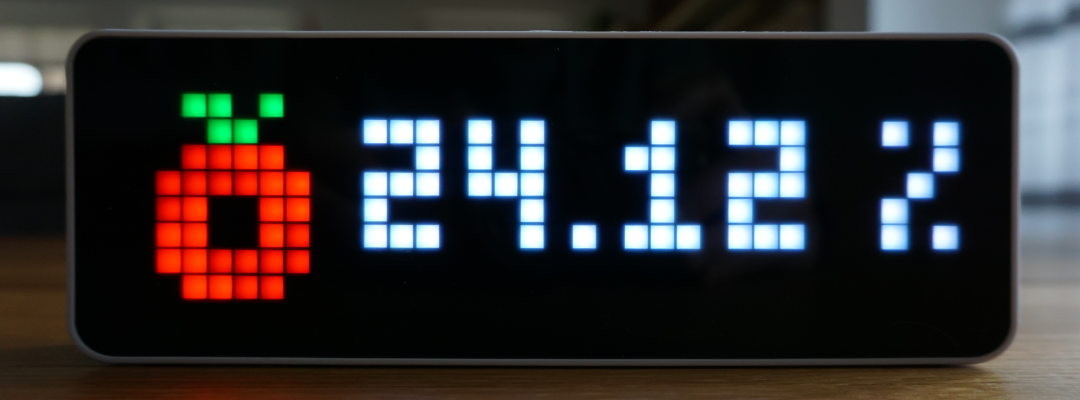
Pi-hole is a network based ad blocker which I've set up in my network. To observe the percentage of blocked network traffic and total amout of blocked requests the Pi-hole sensor data should be submitted to the pixel clock regularly.
The following config shows a part of my automations.yaml and tells HomeAssistant to transmit sensor data for total blocked advertisements and percentage of blocked requests every five minutes to the Ulanzi pixel clock. Data is transmitted as JSON over the awtrix_XXXXXX/custom/pihole_blocked MQTT topic whereat pihole_blocked is the name of the custom app. The app consists of two pages using the icon downloaded in the step before.
- id: 'blocked_ads'
  alias: Blocked ads by PiHole
  trigger:
    - platform: time_pattern
      minutes: '/5'
  action:
    - service: mqtt.publish
      data:
        topic: awtrix_XXXXXX/custom/pihole_blocked
        payload: |-
          [
            {
              "text": "{{states('sensor.ads_blocked_today')}}",
              "icon": 53008
            },
            {
              "text": "{{states('sensor.ads_percentage_today')}} %",
              "icon": 53008
            }
          ]
The automations.yaml file is included in the configuration.yaml of HomeAssistant with the following command.
automation: !include automations.yaml
After a few minutes you should be able to switch pages via the hardware buttons on top of the clock and sensor data should be visible.
Birthday notifications
Another sensible use case is the notification about birthdays based on Google Calendar. Therefore the Google Calendar integration has to be set up and connected to your Google account.
Afterwards an automation can be configured which notifies about birthdays every 30 minutes between 10 and 20 o'clock if the pixel matrix is enabled.
- id: 'birthday_notification'
  alias: Birthday notification
  trigger:
    - platform: time_pattern
      minutes: '/30'
  condition:
    - condition: template
      value_template: |-
        {{ state_attr('calendar.geburtstage', 'all_day')}}
    - condition: state
      entity_id: light.awtrix_XXXXXX_matrix
      state: 'on'
    - condition: time
      after: '10:00:00'
      before: '20:00:00'
  action:
    - service: mqtt.publish
      data:
        topic: awtrix_XXXXXX/notify
        payload: |-
          {
            "text": "{{ state_attr('calendar.geburtstage', 'description') }}",
            "icon": 14004,
            "repeat": 3,
            "rainbow": true
          }
The above configration will display the following notification. (Btw. Happy Birthday Linus Torvalds 🎂).
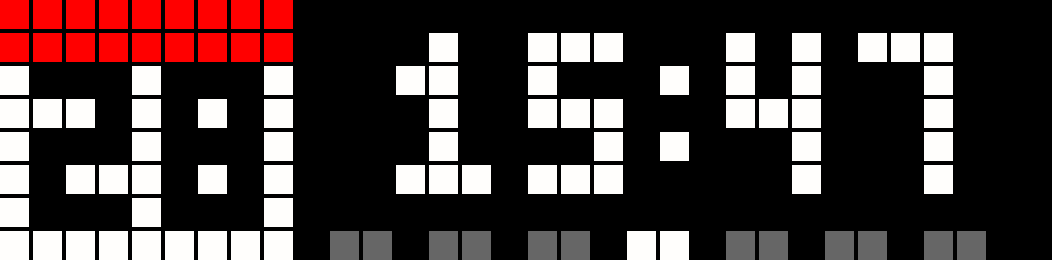
⚠️ The solution above will only display one birthday per day. If multiple persons have birthday at the same day only one will be shown.
I've used a time pattern based trigger in this case to send the notifcation every 30 minutes. It would be also possible to use the calendar event with an offset as trigger (see calendar trigger) but in that case the notification would only be sent once.
Alternatively the calendar event trigger could be used to create a custom app with a defined lifetime, but this would force you to enable automatic page switch.
Update 30.12.: A better solution regarding birthday notifiactions is described in one of my later blog posts (see "Enhancing birthday notifications on Ulanzi Smart Pixel Clock").
Dashboard controls
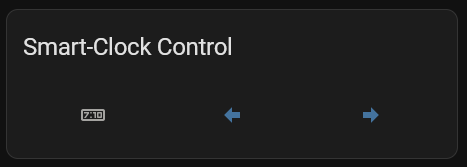
To avoid standing up every time you want to change what's shown on the clock by pressing the buttons on top of it a small UI element for the HomeAssistant dashboard can be created.
The following snippet creates a Glance card allowing you to turn the pixel matrix on and off, change brightness, color and switch pages on the clock via the HomeAssistant dashboard. It uses entities created automatically by setting up MQTT on the clock and enabling "HomeAssistant Discovery".
type: glance
title: Smart-Clock Control
show_name: false
show_state: false
entities:
  - entity: light.awtrix_XXXXXX_matrix
  - entity: button.awtrix_XXXXXX_previous_app
    tap_action:
      action: toggle
  - entity: button.awtrix_XXXXXX_next_app
    tap_action:
      action: toggle
Conclusion
The possible use cases for the Ulanzi smart pixel clock flashed with AWTRIX Light in combination with HomeAssistant are almost endless. It's pretty easy to transmit data to the clock and control it remotely. Currently I'm planning to display the following data on it:
- Apps
- Pi-Hole statistics
- Current power consumption (obtained via bitShake SmartMeterReader)
- Upload- and Download-Speed
- Room-Temperatures (obtained via external sensor)
- GitHub stars for open source projects
- Notifications
- Birthdays (via Google Calendar integration)
- Garbage collection
Via automations it's also possible to enable/disable the pixel matrix via MQTT in order to save energy during the night or when nobody is at home. For further information see Power Control API.