- Published on
Connecting Mi Flora plant sensors via MQTT to OpenHab
- Authors

- Name
- Carsten Noetzel
Preface
When we moved into our house two years ago, we used two old flower boxes from the previous owner to grow herbs and tomatoes on our terrace. In course of the warm summer however, it turned out that the watering of the small boxes is very laborious and has to be done several times a day.
That's why we built a flower bed of three mortar boxes for our plants during winter. To make irrigation easier we decided to put a pressureless bead hose in the boxes and connect it to our rain barrel. A manually operated valve is used to start and stop irrigation and there is no need to drag watering cans anymore.
I would like to automate the watering process itself so that you have the option of being absent for longer even during the growing season. An irrigation computer could help, but they often irrigate at set intervals and not on demand. In spring, when the temperatures are still moderate and the plants are small they need less water than the full-grown plants with fruits in summer.
For this reason I decided to equip the boxes with sensors in the first step to determine the need. I came across the Mi-Flora plant sensors from Xiaomi, which are able to measure also the light irradiation, temperature, fertility of the soil in addition to the soil moisture.
This data is send to OpenHab which could control watering.
Technical Overview

The Mi Flora plant sensors are equipped with Bluetooth 4.1 LE chips for which reason the sending range is relatively small. The Raspberry Pi which runs with Openhab on the first floor is not able to establish a stable connection to the sensors through the outer wall. For this reason I have installed a Raspberry Pi Zero on the ground floor near the terrace which establishes a Bluetooth connection to the sensors and sends the measured values via MQTT to the MQTT broker (here Mosquitto) on the first floor. OpenHab is able to display the measured values in the user interface by using the corresponding binding.
For the communication between the plant sensors and MQTT the miflora-mqtt-daemon from ThomDietrich is in use.
Step 1: MQTT Broker
Installation of Mosquitto
If there is no MQTT broker such as Mosquitto from Eclipse in the network yet, the first step is to set up one. The main task of the MQTT Broker is to receive all messages on certain topics, to decide who is interested in these messages and to forward them to the interested parties (see Publish – subscribe pattern).
In my case the MQTT broker is installed on the Pi, which is also running OpenHab. The following commands will install Mosquitto.
sudo apt update
sudo apt install -y mosquitto mosquitto-clients
In order for Mosquitto to run automatically when the system starts, the Mosquitto unit file must be activated via systemctl.
sudo systemctl enable mosquitto.service
The installation can be checked with mosquitto -v.
The "Error: Address already in use" error can be ignored because it only states that the broker is already active.
Configuration
By default every client can send messages to the broker. Therefore it is advisable to create users who have to authenticate themselves with a password in order to be able to send messages.
Two users are created in my case. One for the Pi which communicates with the plant sensors and one for OpenHab.
The first command creates the passwd file under/etc/mosquitto and creates the user openhab. The second command adds the user miflora to the file with the password being given directly. The passwords are automatically encrypted and saved in the file.
sudo mosquitto_passwd -c /etc/mosquitto/passwd openhab
sudo mosquitto_passwd -b /etc/mosquitto/passwd miflora <password>

To disallow unauthenticated communication another configuration file must be created using sudo nano /etc/mosquitto/conf.d/default.conf.
This file has the following content:
allow_anonymous false
password_file /etc/mosquitto/passwd
Finally the service has to be restarted with sudo systemctl restart mosquitto.
Testing the Broker
The MQTT broker can be easily tested by opening two terminals. In one terminal you register as a subscriber for a certain topic using mosquitto_sub (in this case test).
mosquitto_sub -h localhost -t test -u openhab -P <password>
In the second terminal you send a message to the topic using mosquitto_pub.
mosquitto_pub -h localhost -t "test" -m "Hello World!" -u miflora -P <password>
If everything is configured correctly you should see the message in the first terminal. In addition you should no longer be able to send messages to a topic if no user is specified.
Step 2: Setting up the BT-MQTT bridge
In the second step the miflora-mqqt-daemon by ThomDietrich is installed on a RasperryPi. The Pi is used to connect to the plant sensors via Bluetooth, pick up the data and send it to the OpenHab Pi via MQTT. Due to the short transmission distance of the plant sensors, the Pi should be positioned as close as possible to them.
The following installation is also described on the GitHub project page from ThomDietrich.
Installation miflora-mqtt-daemon
The starting point is a freshly set up and configured RaspberryPi Zero.
First some necessarry packages are installed. Afterwards the project is cloned to /opt/miflora-mqtt-daemon and installed likewise.
sudo apt install git python3 python3-pip bluetooth bluez

sudo git clone https://github.com/ThomDietrich/miflora-mqtt-daemon.git /opt/miflora-mqtt-daemon

cd /opt/miflora-mqtt-daemon
sudo pip3 install -r requirements.txt
In order for the MQTT daemon to run automatically with every system start, the unit file of the miflora service must be copied and activated.
sudo cp /opt/miflora-mqtt-daemon/template.service /etc/systemd/system/miflora.service
sudo systemctl enable miflora.service
sudo systemctl start miflora.service
Register the sensors
Personal settings regarding the sensors are entered in the config.ini. This file must be generated by making a copy of the config.ini.dist.
sudo cp /opt/miflora-mqtt-daemon/config.{ini.dist,ini}
Next step is to scan for available devices using sudo hcitool lescan. The output should look like this and the sensors should appear as a Flower care device in the list.

The displayed MAC address is entered in the config.ini in the [Sensors] section. Since I own two sensors I have created two entries.
sudo nano /opt/miflora-mqtt-daemon/config.ini
[Sensors]
Herbs@Terrace    = C4:7C:8D:xx:xx:xx
Tomatoes@Terrace = C4:7C:8D:xx:xx:xx
Setting up the MQTT broker
Connection data for the MQTT broker, which was installed in step 1 has to be configured in the config.ini under the section [MQTT].
[MQTT]
hostname = <Host name of the device on which Mosquitto is running>
base_topic = miflora
username = miflora
password = <password>
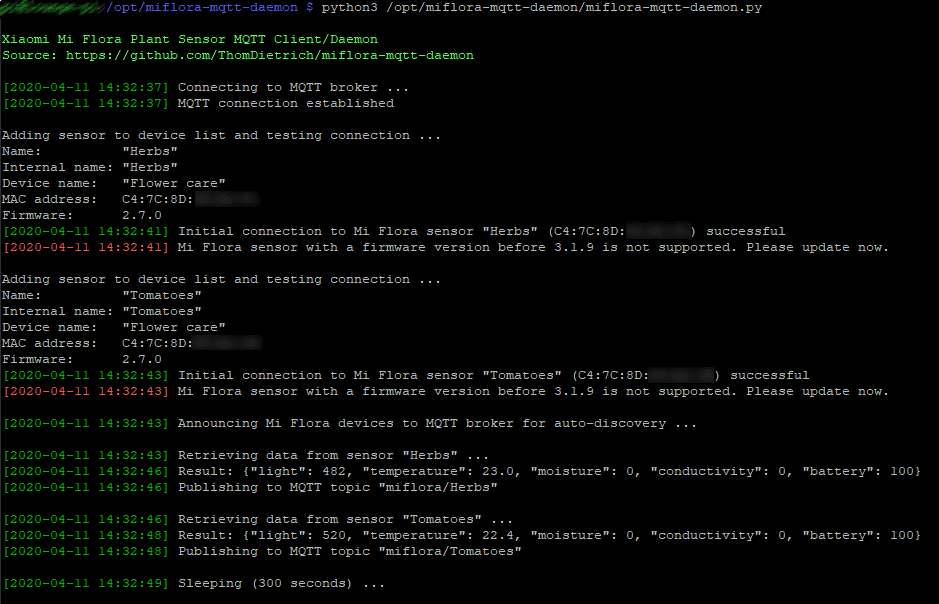
Once the data has been stored the daemon can be executed using python3 /opt/miflora-mqtt-daemon/miflora-mqtt-daemon.py. Now you should be able to see that the plant sensors are queried and the values are sent to MQTT topics.
Step 3: Display data in OpenHab
In order to display data in OpenHab the MQTT binding must be installed via paper UI. Since the data is transmitted in JSON format and individual values should be extracted from it, the JSONPath Transformation under "Add-ons → Transformations" can be added.
If all preparations have been made, the things for OpenHab can be created. The broker and the topics are configured in these. Created a file with sudo nano /etc/openhab2/things/mqtt.things and provide the following content.
Bridge mqtt:broker:mosquitto "MQTT Broker"
[
    host="localhost",
    port=1883,
    secure=false,
    username="openhab",
    password=<password>
]

Thing mqtt:topic:herbs "Herbs" (mqtt:broker:mosquitto) {
    Channels:
        Type number : light         "Light intensity"      [ stateTopic="miflora/Herbs", transformationPattern="JSONPATH:$.light" ]
        Type number : battery       "Battery charge"       [ stateTopic="miflora/Herbs", transformationPattern="JSONPATH:$.battery" ]
        Type number : temperature   "Temperature"          [ stateTopic="miflora/Herbs", transformationPattern="JSONPATH:$.temperature" ]
        Type number : conductivity  "Fertility"            [ stateTopic="miflora/Herbs", transformationPattern="JSONPATH:$.conductivity" ]
        Type number : moisture      "Moisture"             [ stateTopic="miflora/Herbs", transformationPattern="JSONPATH:$.moisture" ]
}

Thing mqtt:topic:tomatoes "Tomatoes" (mqtt:broker:mosquitto) {
    Channels:
        Type number : light         "Light intensity"      [ stateTopic="miflora/Tomatoes", transformationPattern="JSONPATH:$.light" ]
        Type number : battery       "Battery charge"       [ stateTopic="miflora/Tomatoes", transformationPattern="JSONPATH:$.battery" ]
        Type number : temperature   "Temperature"          [ stateTopic="miflora/Tomatoes", transformationPattern="JSONPATH:$.temperature" ]
        Type number : conductivity  "Fertility"            [ stateTopic="miflora/Tomatoes", transformationPattern="JSONPATH:$.conductivity" ]
        Type number : moisture      "Moisture"             [ stateTopic="miflora/Tomatoes", transformationPattern="JSONPATH:$.moisture" ]
}
The first lines create a broker and configure the connection. After that the channels for the two sensors that are listening to different topics and extract the values from the JSON using the JSONPATH transformation are configured.
For displaying data in Openhab items are required. The file is created via sudo nano /etc/openhab2/items/miflora.items and has the following content.
Group gHerbs
Number:Illuminance      Miflora_Herbs_Light             "Light intensity [%d lx]"   <light>         (gHerbs) { channel="mqtt:topic:herbs:light" }
Number:Dimensionless    Miflora_Herbs_Battery           "Battery charg [%d %%]"     <battery>       (gHerbs) { channel="mqtt:topic:herbs:battery" }
Number:Temperature      Miflora_Herbs_Temperature       "Temperature [%.1f °C]"     <temperature>   (gHerbs) { channel="mqtt:topic:herbs:temperature" }
Number                  Miflora_Herbs_Conductivity      "Fertility [%d µS/cm]"      <lawnmower>     (gHerbs) { channel="mqtt:topic:herbs:conductivity" }
Number:Dimensionless    Miflora_Herbs_Moisture          "Moisture [%d %%]"          <humidity>      (gHerbs) { channel="mqtt:topic:herbs:moisture" }

Group gTomatoes
Number:Illuminance      Miflora_Tomatoes_Light         "Light intensity [%d lx]"    <light>         (gTomatoes) { channel="mqtt:topic:tomatoes:light" }
Number:Dimensionless    Miflora_Tomatoes_Battery       "Battery charg [%d %%]"      <battery>       (gTomatoes) { channel="mqtt:topic:tomatoes:battery" }
Number:Temperature      Miflora_Tomatoes_Temperature   "Temperature [%.1f °C]"      <temperature>   (gTomatoes) { channel="mqtt:topic:tomatoes:temperature" }
Number                  Miflora_Tomatoes_Conductivity  "Fertility [%d µS/cm]"       <lawnmower>     (gTomatoes) { channel="mqtt:topic:tomatoes:conductivity" }
Number:Dimensionless    Miflora_Tomatoes_Moisture      "Moisture [%d %%]"           <humidity>      (gTomatoes) { channel="mqtt:topic:tomatoes:moisture" }
Representation of individual values can be determined here. Data basis are the values from the channels that were previously created in the Things files.
The following content can be added to the default.sitemap for displaying values.
  Frame label="Plantsensors" {
    Group   item=gHerbs     icon="herbs"    label="Herbs"
    Group   item=gTomatoes  icon="tomato"   label="Tomatoes"
  }
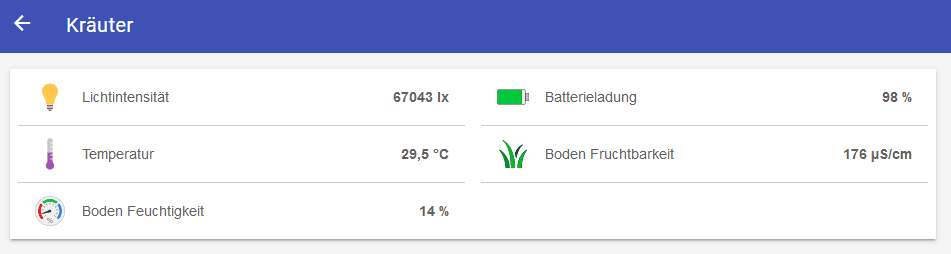
The OpenHab configuration is now complete and the values should be accessible via sitemap.
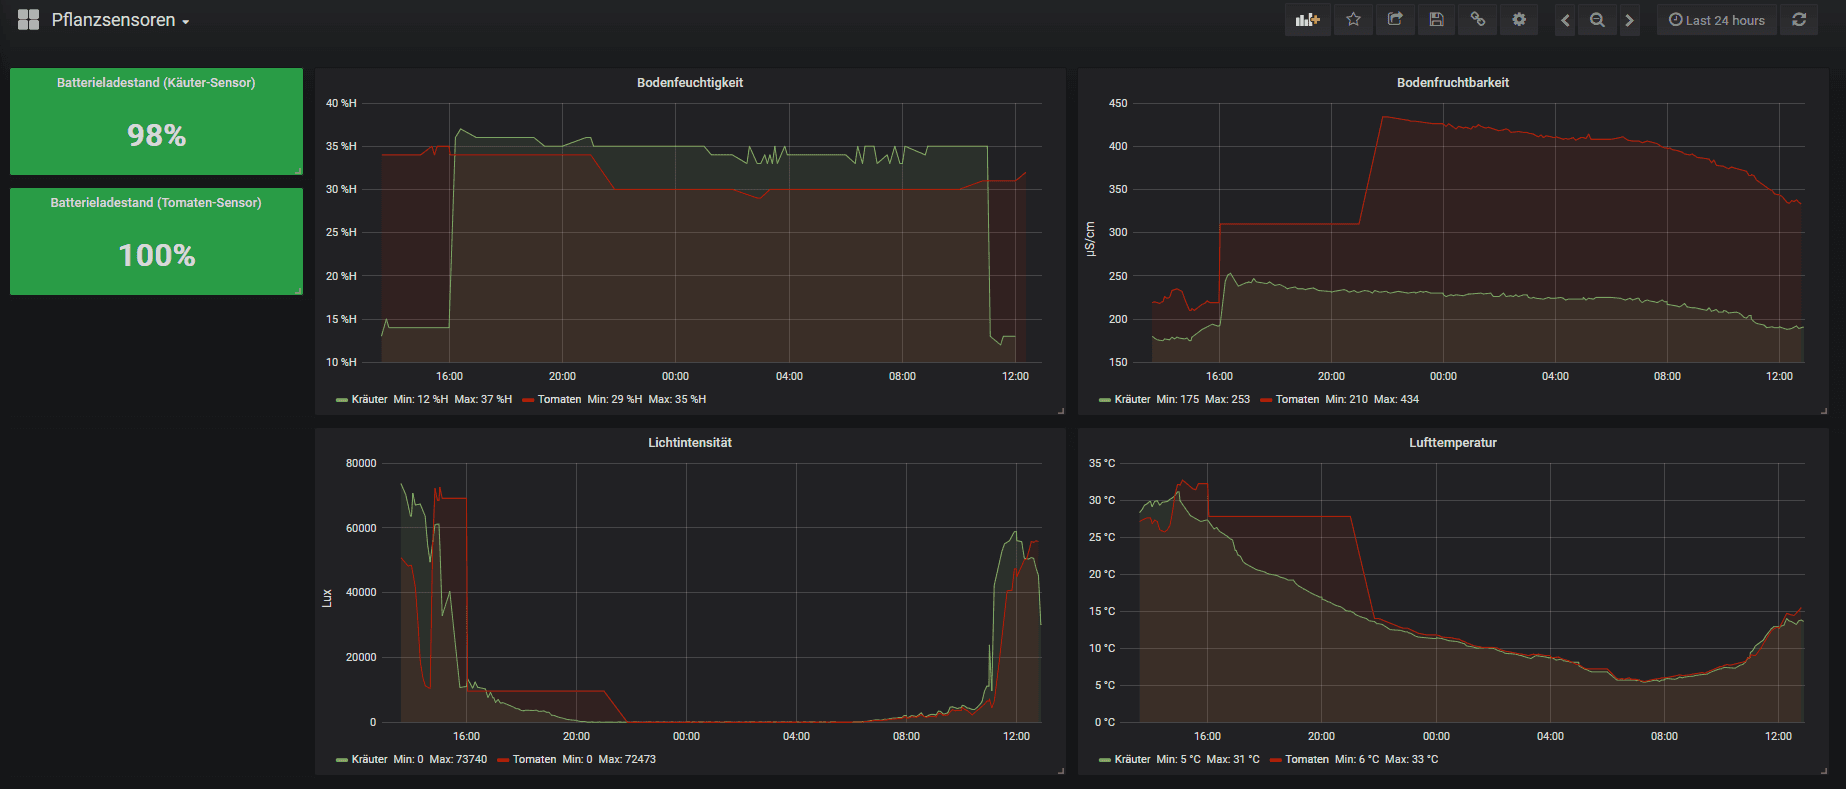
As you can see it was a sunny Easter Sunday 2020 😉
Conclusion
With little effort it is possible to access values from the sensors and display them in OpenHab. This is the first step towards automated irrigation. If you want you can also use OpenHab to persist the collected data and create a dashboard in Grafana.
An example is the conference plant by Marianne, whose article also inspired me to implement this project.
With such a dashboard you can see both the current and the historical data. This helps to check that there is enough watering and that the watering is even enough.